Pages

Sunday, December 30, 2012

2012 Gratitude

As the year comes to a close I have to say I do spend the last few days in a deep reflective mode.  Thanking everyone who has supported me this year, through this journey and expressing my gratitude wherever I can. I have had a tough year in some respects; the loss of family members, friendships coming to an end, stress in personal life and in business. No one has a perfect life but many are too focused on what is wrong rather than what is right.

I create a gratitude list for myself. It helps me truly focus on what, in this last year I am truly thankful for and to create my goals for 2013. My gratitude lists are simple. I choose 5 or 6 BIG things and write a statement for each. I also write myself a statement.

I review my list and then file it for times that I feel stuck, pissed off, or frustrated. I read it and end up feeling silly that a person or situation caused me to be upset at all and waste TIME. The most precious commodity we all have.

Are you ready to make your list? 

My List:

1a) FAMILY - My husband and children who love and support me. I am thankful for their health and who they are.
1b) Extended Family - My mom, dad, grandmother, sister, nieces and nephew. All of my cousins. I am grateful for their presence in my life which has shaped who I am.

2) FRIENDS - NEW and old. I am grateful to those who have revealed who they are through both word and deed this year.  I am grateful for the love and support I receive from the 'positive' ones.

3) CREATIVITY - Listening to my inner voice and acting on my creative impulses - win or loose - has helped me this year. May my creative cup be full and my voice never silent.

4) TIME - I am thankful for the time I have been given. Time to create, to love my family/friends, and to choose. I am thankful for my alone time and my family time.

5) NATURE - All elements of nature forever serve to inspire me. Inspire me to create, to live better and to do better.

6) CHANGE - Without change there can be no growth.


Statement: I look optimistically toward 2013 - I CHOOSE to look for the joy, the opportunities and the love. I choose to embrace it all with grace and gratitude.

BLOG GOAL: To continue to write my blog in the hopes of empowering and/or inspiring my readers. At the  very least the provision of entertainment to those who stumble upon my little digital space. 


What's on your gratitude list? Do you make resolutions or goals as a new year approaches?

Saturday, December 29, 2012

The Royal WAVE

Hair ~ a constant creative challenge. We literally have everything at our fingertips with a million DIY hair tutorials online. A quick trip to the salon can also be a transformative experience. A cut, color, and a scalp massage does wonders for your self esteem and current mental state. Some of my most relaxing afternoons have been spent at a salon, which I think any busy woman can attest too. What to do when there is no time or $ for the salon experience? take matters into your own hands, literally!

My current state of aHair's is: black, straight and long.

I recently discovered Conair's YOU Wave Ultra styling tool.
Check out their DEMO Video HERE

Price: $39-49 (On sale NOW for $19 at SEARS
411: 3 Barrel Ceramic Styler. Preventing hot spots.
Styling Time: Approx.15 minutes is all you need to achieve mermaid-esque waves.
 SPLASH 80's Throwback Waves

 
with my husband and daughter


Fashion FYI: No one does a wave look better than model Naomi Campbell. She is modelling royalty and ROCKS this look. 
 Red Carpet Royal Wave
Naomi on set of her NEW show The Face (Airs in Feb on Oxygen)

Will you 'doo' the Royal WAVE?
Share your thoughts and photos below!

Friday, December 28, 2012

RING in the New Year

FYI: Vogue Gioiello was founded in 1980, and is published five times a year in Italian/English.  The magazine is devoted to the design and production of fine jewellery, goldsmithing and watchmaking. 

RINGS are on of my FAV accessories. There is nothing like a fabulous piece of finger bling to take your look up a notch or at least start a random style conversation while going about your day in public.

My taste in rings is all about the DESIGN, not the price tag. I have an instant attraction to Vintage pieces but other than fine estate jewels, I found it hard to source substantial cocktail rings that were authentically Vintage. 
I created my own RE-Styled line of rings, housed in the Evolution REWIND accessory division. I use authentic vintage brooches and re-style them into fabulous contemporary cocktail rings. Thus, REWIND Rings were born.
Ever wonder where the term "Cocktail Ring" came from?
During the prohibition era (1920's) it became socially acceptable for women to drink, smoke and touch up their makeup in public. They would attend private/secret "cocktail parties" and adorn their fingers with what is now known as a cocktail ring. By definition it is a large ring that would attract attention when the wearer tipped their cocktail to take a drink. 
Cocktail rings were/are constructed from both costume and fine gems/materials. In the 1940's and 1950's they re surged in popularity as the Cocktail Party became a popular social event.  They are STILL a fabulous accessory both high and low end. I personally believe that ANY event is cocktail ring appropriate; parties, grocery shopping, dinner and more.
Will you rock a statement or "cocktail" ring as you RING in the New Year?

A Few of my Fav's, all price ranges, era's and materials! There are SO MANY I could share. I will do so via follow up posts and feature stones, designers and styles. There is literally something for everyone in price point and design.
 Vintage Art Deco - 9k gold ~ $265


REWIND Panther Ring ~ $110

VintageTurquoise Costume Cocktail Ring ~ $16


Vintage Coral Cabochon Ring ~ $40

REWIND Mauve Oval Filigree Ring ~ $60

Treat yourself and RING in the New Year in STYLE!

Monday, December 24, 2012

Christmas Craft: DIY Candy Cane Vase

This festive vase will mark the end of my Christmas Crafting. I know it is last minute but this festive arrangement takes only minutes to construct. You can pull it together today and have it on your Christmas dinner table tomorrow or take it to your event as a hostess gift.  Choose materials based on your decor and away you go.

You Need:
*Candy Canes
*Can, Jar, or Vase
*Rubber bands
*Glue Gun
*Ribbon
*Any other adornments
*Plant/Flower
**Tray (If you are making for a centerpiece)

I used a tin can from a Christmas hot chocolate.  
Line up the candy canes and secure using the rubber bands (They are slippery and tricky so don't get frustrated)
Use the hot glue to glue the ribbon over top of the rubber bands.  I used Vintage rhinestones to adorn the front of this piece. Use a Christmas tree ornament, piece of jewelry or anything else you have on hand to make this uniquely YOURS.
I used a silver tone service tray lined it with metallic tissue paper and the left over ribbon from the vase.
Add your plant/flower to the vase. I used a tropical plant and purchased a rose and twigs separately. I created a unique arrangement of my own using these 3 elements.

Place on the table or take as a hostess gift to enjoy.  remove the tropical plant and enjoy all year round. Store your creation and use again next year!

MERRY CHRISTMAS!
Shower those you LOVE with LOVE
XO


Sunday, December 23, 2012

Santa Berry

This Christmas I have been on creative FIRE. I am so very far from home (My native Ontario, Canada) and miss my family the most at this time of year. I have managed to keep myself busy by crafting, baking, shopping and wrapping.

My daughter has her Pre-School Christmas Concert last week and I felt compelled to whip up a festive treat for the kids and parents.  I can only partially take credit for the creation as the Strawberry Santa's I saw on-line somewhere, but the winter wonderland scene was all my own.

This would make an amazing edition to any Christmas Eve event or Christmas day treat table. Fun for the kids to help make and eat!

What you need for Santa:
*Strawberries (1lb or more)
*Creamed Cheese (You can substitute Whip Cream too) - 1 pkg
*Powdered Sugar (3-4 TBSP or to taste)
*Vanilla Extract (1 Tsp or to taste)
*Candies (something for the eyes)

Clean and prep the berries. I cut mine in half. larger on the bottom leaving the pointed top for the hat.

Mix Softened cream cheese, powdered sugar and vanilla in a bowl. I used a tea spoon to add a dollop of the mixture on the strawberry base and add the hat.

You can decorate by adding candied eyes (I had left over sprinkles from Halloween Cookies & Cakes), you can add a tiny dollop on top for a pom-pom, I used tiny "pearl" candies for buttons by pressing them into the strawberry base.
If you have time and are extra crafty you can mould the cream cheese mixture into little beards :)
(I alternated colored eyes too)

I also started to set the scene with powdered sugar as "snow"

The Scene - What you need:
* Serving Tray
*Pineapple
*Shaved Coconut
*Maraschino Cherries
*Mini-Marshmallow's
*Candy Canes (Number depending on tray size)
*Orange (1)

I wanted a focal point of my tray to scream CHRISTMAS and what better way than a giant tree.  I cut the top off of a fresh pineapple and used it for the tree center. You could use the excess pineapple for Santa Stands or make little benches for your strawberry santas or gifts under the tree. I was in a pinch for time so I used it in my next day breakfast smoothie (that's a whole other blog).
Dust the ground and tree with the shredded coconut "snow" and decorate the "tree" - I used the cherries, marshmallows and sliced oranges for the top! You can use any fruits or candies that you want.
I trimmed out the tray with candy canes, unwrapped of course and ready for the kids to snag and savour.

TIME: approx 30min

EAT & ENJOY

What is your FAV holiday dish to bring to parties or events?


Wednesday, December 19, 2012

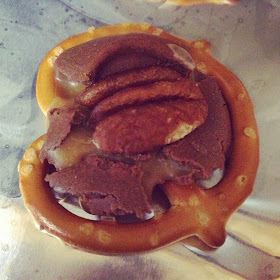
Treat 411: Caramel Pecan Delights

I am always thrilled when a friend takes the time to bake home made treats, wrap them up in a fabulous package and share them. I was delighted to find pretzel perfection inside my goodie bag from my friend Jensine. Let this Danish Diva walk you through the easiest treat of the season!

From Jen's Kitchen: 


Seasons Greetings, fab ladies! Lisa G has asked me to share this obscenely simple recipe for Caramel Pecan Delights. If you are in a pinch and need to whip up something for a party or a sweet and savory treat to share with those you love, then grab these three ingredients: 
*mini pretzels 
*a bag of Rolos
*bag of pecan halves.
 Want to make this recipe even easier? Enlist the help of your beautiful daughter (or handsome son, hubby, etc.). My eldest daughter, Kaia, is quick to assist me in the kitchen when she sees me put on the apron (especially when I am wearing the reversible one that she and my mom sewed for me one Mother’s Day). She is a speedy Rolo peeler.
 If you haven’t made friends with parchment paper, now is the time to do so. I discovered this amazingly functional baking tool just last year and it has changed my life!! Cut a piece of parchment paper to line a large baking sheet ( NordicWare makes a fantastic commercial baking sheet). Place pretzels on parchment paper and stack a Rolo onto each pretzel.
Bake them for 4 minutes in an oven preheated at 350 degrees. Remove from oven and immediately press one pecan half onto each melty Rolo (Mmmmmm…hungry yet?)
 Here is the toughest part of the recipe for me…making room in the refrigerator so that these perfectly salty sweet treats can chill out before making their way into your mouth!
          Oh, and don’t forget to wear a one-of-a-kind Evolution Rewind ring while baking.
Vintage Cherub Ring - Evolution REWIND
  ENJOY!

Thanks Jen! 
Will you make these? or have you made these before? Share your experience in the comments!

Tuesday, December 18, 2012

PEARLfection

With mere days between me and Christmas Day I was in Decor Distress. I did not feel like I had enough and required something else to add to my "decking the halls"details.  My tree this year has a pearl garland and DIY ornaments complete with loose pearls and feathers. I wanted something cohesive to add to the overall display.  On-line I found a fabulous idea perfect for my festive table; Pearls suspended in water gels.

There are several ways you can do this depending on your decor. You can use a vase, jars or a giant punch bowl! You can float candles or use for a floral arrangement. The only limit here is your imagination.  The pears (and there are also crystals) are available in a whole host of sizes and colours. You can even get waterproof LED lights for your display


I opted for traditional black and white as it was appropriate for my decor.

The company: Vase Pearlfection can supply you with everything you need for your creation.

What you need:

* Water Gels ($3 + shipping)

* Water

*Pearls and/or Crystals ( I chose Black & White) - $6 + shipping

*Candles or Flowers (Size will depend on your vase or container -  I got a dozen (12) in white  for $14.99 + Shipping)

Don't panic, your gels will come with instructions. Here is the short version:

1) Select your container. I used a vase I had on hand.  Be creative and use anything glass - jars, glasses for a smaller scale or a large glass bowl!  
* I used 8 cups of water per my 1 pack of tiny water gel beads.

2) Let them soak for 12-14 hours and watch them expand. Room Temp water helps this process go along faster.
3) Drain off excess water and place in a separate container.
4) Put some back in and start to place your pearls. Layer expanded gel's and pearls until you have reached the desired amount and location of your pearls.
5) Once it is full again with the gels and the pearls replace some of the water. (TIP: Place ONE drop of bleach in water to prevent algae or discolouration over time)

6) Place your candle on top (or flowers inside if that is what you are using)
VOILA! 
Place on your table as a centerpiece or around your home!


Will you try one? What will you use? Tell me in the comments below!